Cheat’s Toasted Marshmallow Ice-cream

First of all, I have to confess that if you are looking for a recipe for making your own ice-cream, you’ll be disappointed. This was a major shortcut/experiment and was an exercise merely designed to coax some summer weather gently back into our lives again! Second confession; I am not that into ice-cream! I am in the tiny minority in my family though and these little bites of summer went down a treat with the gang here!

I made the ice-cream the day before and then I went OTT (as I like to do) and made the Graham Crackers (for serving it in ice-cream sandwiches) from scratch to get the real s’mores effect. They were, I think, not worth the bother. In future, I’d either buy a nice cookie, or use any nice chocolate chip recipe which would be faster and would not require two rounds of chilling for the dough!

1 tub of Vanilla Ice-cream (I used Aldi, 900ml tub)

Few handfuls of mini marshmallows (enough to cover a shallow swiss roll tin)

1 small handful of chocolate chips

3-4 chocolate chip cookies, crumbled

Cookies, to sandwich the ice-cream, if desired


Take the ice-cream out of the freezer to soften up. You will need to be able to fold the ingredients through it. Now prep the tin that you will freeze your ice-cream in. Double line an 8×8 tin with cling film, leaving enough of an overhang at the sides.

Now, take a shallow tin and line it with non-stick foil (or foil brushed with a little oil) put the marshmallows and chocolate chips in an even layer. Preheat the grill to a medium/high setting for toasting the mashmallows. Beware! They will go from toasty to fire hazard so actually stare at them as they toast. They will be done in two minutes!

When done, fold gently into the ice-cream in a large bowl, adding two of the crumbled cookies (or more to taste) Moving quickly now, scrape it all into the prepared tin and smooth over the top sprinkling a few crumbles on top.

Freeze.

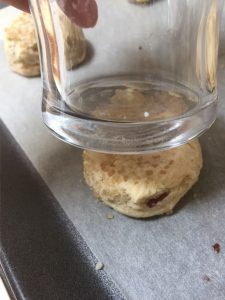
You can serve as is, with a little chocolate sauce, or as an ice-cream sandwich, using cookies or wafers.

Pecan and Chocolate Chip Scones

I tend to use the BBC Good Food recipe for Ultimate Scones. It has never failed me and I can make it in my sleep at this stage. It’s a lovely basic recipe and perfect with jam and cream. I’ve added pecans and chocolate here. I usually double it as when you are going to all the bother of getting your hands and worktop messy, you should make it worth your while! I throw some raw unbaked ones in the freezer and bake them from frozen at a later date (just adding a few minutes to the cooking time), which is handy. This makes about ten or so:-

450g self-raising flour (plus extra to dust)

100g butter, cold

50g sugar

250ml buttermilk plus about 8 tblsp milk to thin it out

50g of chopped dark chocolate

50g chopped toasted pecans


Preheat the oven to 220c/200c fan. Put the flour in a large bowl and add the butter. I like to grate my butter in. I have an ancient grater and am so unwilling to part with it as it does this job perfectly.  Just grab the butter rub it in the flour and grate away – makes the butter very easy to mix in with the flour.

Mix it in every so often. Now mix in the sugar and make a well in the middle. Mix the buttermilk in using a butter knife to incorporate it all together. Now gently mix in the nuts and chocolate.

When mixed, tumble it out onto a floured board. Less is more in terms of handling now. Pat the dough out to a thickness of 2.5cm. Using a cutter of approx 4cm diameter, cut the scones out by pushing the cutter straight down. Twisting it makes them wonky! Work the scraps together and cut more out, placing them on a baking tray. Bake in a preheated oven for 12 minutes and cool on a wire tray.


Pavlova

This is a nod to my old pal and workmate N. If there was a birthday or a reason to celebrate, this wonder appeared. She also made all things better in our office by appearing with this at other times too. It is just delish. I love to use golden caster sugar as it makes the meringues creamy and golden looking.

A couple of pointers when making pavlova: Make sure your bowl and tools are completely clean and grease free. It may seem an obvious point but any leftover butter will spoil your meringue. Let your meringue cool in the oven too, so if you have other items on your menu, plan accordingly!  Finally, fill at the last minute if at all possible. Eat immediately – this is never usually a problem.

Ingredients

4 egg whites, at room temperature

225g caster sugar

1 tsp cornflour

1tsp white vinegar

1/2 tsp vanilla extract

Begin by drawing a 20cm circle on a piece of baking parchment and place on a cookie sheet. This will be your outline for your pavlova. Preheat your oven to 120c

If you would like to make individual nests that serve one generously, draw 4 inch circles on parchment paper – I can usually get around six out of this quantity.

Whisk the egg whites until stiff in a stand mixer (or with a handheld electric whisk) then beat in the caster sugar 1 tablespoon at a time. Follow with the vanilla extract, vinegar and cornflour.

Spoon the mix onto the circle of parchment and make a slight indentation in the middle. Bake for 1 hour until firm. If you are making the individual mini(ish) versions, they will bake at 120c for 30 minutes before you turn off the oven and let them cool. Either way, after the time, turn off the oven and let the meringue cool in the oven with the door closed  this prevents too much cracking

Here are a few ideas for fillings:

A selection of berries marinated in 2 tblsp of balsamic vinegar, 2 tsp of brown sugar and 1/2 tsp of vanilla extract. I used raspberries, cherries, blueberries and strawberries. I filled the nests with half whipped cream and half greek yoghurt and topped with the berries

Sliced mango and strawberries with basil and a teeny squeeze of lime. Again, I used equal parts greek yoghurt and whipped cream.

And my current favourite: roast apple with hazelnut and maple syrup. Inspired by a Diana Henry recipe, I roasted peeled cored apple halves sprinkled with brown sugar at 190c for 20 minutes, removing them from the oven and drizzling them with a little maple syrup and letting them cool. When cool, dice them any way you want, they don’t need to be uniform. Again fill the nests with a mix of whipped cream and greek yoghurt and a touch of maple syrup. Top with the diced apple and a little of the maple/apple juices and sprinkle with some toasted hazelnuts. Heavenly.


Cheese and Onion Crisp Cookies

Now bear with me. This you will either love or hate. Please don’t knock it till you try it. If you like the salty/sweet combo you will love these cookies. If you don’t there is something wrong with you!!! In blind tests conducted by me on unsuspecting friends and family, most did in fact like these cookies when they tasted them – interestingly not everyone figured out the ingredients!

Again, I’m grateful to the smitten kitchen for the fabulous recipe, though I did put an Irish twist on it with the cheese and onion 😉 I did not add extra salt to the cookie batter though I did go totally over the top and sprinkle crushed crisp crumbs, Maldon and drizzle chocolate too.

1 cup (225 grams) butter, softened
1/2 cup (100 grams) golden caster sugar,

1/2 cup demerara sugar – or a coarser sugar for rolling
1 tsp vanilla extract
1/2 cup chopped and toasted pecans
1/2 cup finely crushed crisps. I used Keogh’s Dubliner Cheese and Onion
2 cups (250 grams) all-purpose flour

For the topping:

1 tblsp crushed crisps, as above

1 1/2 tsps Maldon salt

4-6 squares of chocolate (at least 52%)melted, for drizzling
1 teaspoon butter

Preheat oven to 170c. Line two baking trays with baking paper and set aside. With a stand mixer, beat the butter with 1/2 cup of the sugar until pale and fluffy. Add vanilla, pecans, 1/2 cup crushed crisps and flour and gently mix until combined.

Place the coarser sugar in a small bowl. Roll tablespoon sized scoops of dough into a ball with your hands.  I used a cookie scoop to measure. Roll them in the sugar then place on the prepared tray – use a cup or drinking glass to gently flatten them.

Sprinkle each cookie with some crisp crumbs and a few flakes of salt.

Bake cookies until lightly golden at the edges, about 12-15 minutes. Transfer to cool on a wire rack.

Melt the chocolate and butter until smooth and drizzle or dip the cookies and let set on a rack. Enjoy.

Halloumi with Balsamic Cherries and Lentils

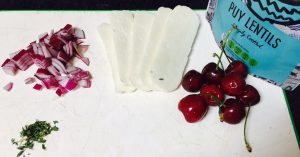
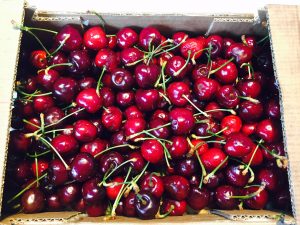
This is another quick one which is a very handy starter or light meal, borne out of my purchase of the previously mentioned crate of cherries. It’s ready in less than 20 minutes and is just a little bit different. I used about 2/3 of a pack of halloumi for two light suppers but you could make a pack stretch to a starter for four. I just love halloumi – it’s so very tasty, moreish, fast to make and a pack can lurk in your fridge as a staple. In fact much of the ingredients below are store cupboard except for the fresh ones so it’s not a bad back up plan to have. I used the smoked garlic paste from Tesco and the chargrilled peppers were from a jar (Aldi) in the fridge. The puy lentils were of course my fav staple from Merchant Gourmet and the halloumi was from Tesco but widely available.

Ingredients to serve two as a light supper/starter

8-10 cherries, pitted and diced

2 tblsp balsamic vinegar

1 tsp butter

1-2 tblsp oil

1-2 tblsp diced red onion

1/2 tsp smoked garlic paste

150g approx halloumi cheese sliced lengthways into six slices

1-2 slices of chargrilled peppers, drained and sliced

few leaves of thyme

1 pack of puy lentils

1-2 tblsp balsamic dressing (to taste)

some rocket leaves


Heat the butter in a medium sized pan. When melted, add the cherries and after a minute, the balsamic vinegar. Let it bubble down on a medium to low heat – keep your head away – the fumes are very unpleasant!!

Move the cherries around the pan, and don’t let them go entirely dry. Decant to a bowl and set aside for now.

Wipe out your pan and heat a tablespoon of the oil. Add the onion and smoked garlic paste and soften for a couple of minutes. Add the thyme leaves. Now add the pack of lentils and the peppers and heat through. Remove and keep warm.

Wipe pan (last time I promise – but you’ll only have one pan to wash!) Heat remaining oil in the pan and now fry the halloumi for 1-2 minutes each side on a medium heat. Now stir some dressing through the warm lentils to taste. Get your plates ready – it’ll all be ready fast – put some rocket down on the plate and spoon the lentils over. Place the halloumi on top and spoon the cherries and their juices over. Serve and enjoy.


Cherry Buttermilk Cake


I saw this lovely crate of cherries in the supermarket today and had to have them. They are my daughter’s favourite fruit although my two kids will easily clear a large bowl each in a single sitting – their hands look like a bloodbath afterwards. I had other plans for these little bursts of sunshine though.

It was fate as I scrolled through and saw the Smitten Kitchen recipe for Raspberry Buttermilk Cake appearing and I thought I would try it with the cherries and it was yummy – done in no time at all and just the perfect everyday or rainy Thursday kinda cake. Feel free to use the raspberries though, as in the original. Deb Perelman is one of my food heroes and she can do no wrong as far as I am concerned!

Ingredients to make one 8.5 to 9inch cake

1 cup (130g) of plain flour

1/2 tsp baking powder

1/2 tsp baking soda

56g butter (Deb used unsalted and added salt; I just used salted)

2/3 cup golden caster sugar (146g) plus 1.5 tblsp (22g), divided

1/2 tsp vanilla extract

1/2 tsp lemon zest (Deb notes it’s optional – I used it and it was lovely)

1 large egg

1/2 cup (120ml) buttermilk

1 cup cherries, pitted and halved.


Preheat oven to 200c and prep a 9inch (mine was 8.5!) round loose bottomed tin. Beat the 2/3 cup sugar and the butter in a stand mixer until it is nice and fluffy. Add the vanilla, zest, egg and beat well making sure to scrape the sides down so that the batter is well mixed.

Mix the flour and baking powder and baking soda together and add to the mixer bowl in three lots, alternating with the buttermilk and ending with the flour. Mix until just combined. Spoon the batter carefully into the cake pan and smooth the top. Scatter the cherries or dot them over the top of the batter – I put them gently into the top of the batter and the baking sank them ever so slightly into the cake.

Sprinkle with the remaining sugar and bake for 20-25 minutes until a cake tester pierced in the centre comes out batter free. Mine was done after 22 minutes.

Cool for 10 minutes in the tin on a cooling rack and them turn on to a plate – serve with warm with whipped or pouring cream.

the dip to end all dips


I first came across warm dips when we were living in Toronto a number of years ago. There and then dips were, well, pedestrian. I, however, was transfixed! When going to parties and gatherings, people brought all variations of these DIPS. This is a version of my favourite. The warm artichoke dip. It has truly never met a carbohydrate it didn’t get along with, or a glass of wine for that matter. Serve it with any manner of breads, crackers, breadsticks, crudités and your favourite beverages. It certainly starts conversations! You can get tinned artichokes in brine (Epicure) in Supervalu, Avoca and Nolans in Clontarf. I haven’t tried it with the artichokes in oil – I’d imagine they’d be very oily. I’m now on the lookout for frozen artichokes…..!


Warm Artichoke Dip

1 tin of Artichokes in brine
1 cup (250ml) of mayonnaise
2 cloves garlic, crushed
1 cup (250ml) of grated parmesan
black pepper to taste

Preheat your oven to 170C . Drain the tin of artichokes. Chop roughly and place in a bowl or a pyrex jug (I find the jug handy for the immersion blender). Add mayonnaise, garlic and some black pepper to taste. Blitz with a handheld immersion blender until reasonably smooth, but leaving some texture. Add most of the parmesan, retaining a couple of spoons for later.

Decant the dip into an oven proof dish and sprinkle the remaining cheese over the top.

Bake uncovered in the oven for 20 minutes, until the top is golden and bubbly. This will keep warm for a while no problem just as long as you can keep away from it. It’s very forgiving if the guests are late!

Serve with aforementioned delicious things to dip-in-the-dip!

Smoky Baked Meatballs with Chickpeas

This all started with a jar of (diced) chipotle peppers and another wave of excitement as I discovered that they were available in one of my local supermarket aisles and not just by mail order (I know I know) They are smoky, spicy and make the most delectable dishes, mayos, braised and slow cooked dishes. I just love them. A little goes a long way though! I also used a tin of cherry tomatoes I got in Lidl from the Italiamo range, which were lovely so do try and use them, but tinned tomatoes would work too. This dish serves 4 generously with a salad and maybe some crusty bread. On the night in question, I had some leftover potatoes. I chopped them up and fried them until crispy and served them with some mayo mixed with a squeeze of lemon and chopped fresh herbs (dill, basil and coriander – just what I had in the fridge). Yum 🙂

Meatballs:

400g lean mince beef

1 shallot, minced/finely chopped

1 large clove garlic

3-4 tblsp olive oil

1 tsp smoked paprika

1 egg, beaten

75g breadcrumbs

Sauce:

1 tin cherry tomatoes in juice (or tinned chopped tomatoes)

1 red onion chopped

1 clove garlic, chopped

2 tblsp tomato puree

1 tblsp brown sugar

1 tsp chipotle paste

1 tblsp balsamic vinegar

250ml beef stock

1 tin chickpeas, drained

100g grated cheddar

Preheat the oven to 180C. Heat 1 tblsp oil in a wide frying pan and gently fry the shallot and garlic for five minutes, until soft, not coloured. Stir in the paprika. Fry gently for one more minute and remove to a large bowl, leaving to cool for a few minutes. Add in the breadcrumbs, egg and mince and mix well. Roll into walnut size balls – I got 23-24. Heat 1 tblsp oil in the pan and fry the meatballs (in batches if necessary) – until nicely browned – it’s not necessary to cook all the way through and set aside in a large ovenproof casserole.

Wipe out the pan and heat another spoon of the oil. Fry the red onion and garlic gently for a couple of minutes, then add in the tin tomatoes, vinegar, chipotle, puree, sugar, beef stock and chickpeas, bring to a simmer and let bubble for 6-7 minutes or until slightly reduced and looking a little glossy. Gently decant into the casserole dish over the meatballs and sprinkle the cheddar over the top. Bake in the oven for 20-25 minutes until golden and bubbly.


Chopped Asian Salad with Lime and Coconut Chicken

This is a tasty dressing that is lovely mixed with a chopped vegetable salad and grilled chicken or prawns. It’s just perfect for the warm weather we are having right now. I like to make it up in a jar and it will happily sit in the fridge ready to be used. I paired it here with an old Good Food hack for a pack of mini chicken fillets. It turns them into something interesting! We ate this warm and also cold for lunch too. Gotta love a dish that keeps on giving.

I chopped up a whole mix of veg – salad leaves, mint, coriander, carrots, peppers, sugarsnaps, scallions, some broccoli and mixed it with quinoa too. Anything goes.

Asian dressing

1 tblsp shallot, minced/diced very finely

3 tblsp rice wine vinegar

2 tblsp dark brown sugar

1 tblsp wholegrain mustard

pinch maldon salt

pinch cayenne

1/2 tsp ground ginger

2 cloves garlic, crushed

2 tsp sesame oil

80 ml olive oil or rapeseed oil.


Mix the shallot, vinegar, sugar, mustard, salt, cayenne, ginger and garlic together and leave for a few minutes. Then gradually whisk the oils in. Season to taste, if necessary. Keep in a jar in the fridge for a few days.

Lime and Coconut Crusted Chicken

Pack of chicken mini fillets or 3 chicken fillets

zest and juice of 2 limes

2 tsp curry powder

pinch chilli powder

75g dessicated coconut

Preheat the oven to 180C. Slice the chicken fillets (if using). Mix the chicken with the zest, juice, curry powder and chilli powder in a bowl. Place the coconut in a ziploc bag. Line a baking tin with foil and a slick of oil.

Once the chicken has sat for a few minutes, then place it in the bag so that the coconut sticks to it and shake it around making sure the chicken pieces are coated.

Place them carefully on the tray and bake for 20 minutes or until cooked through and toasted, turning once. Serve with the chopped salad and asian dressing.


Lime Curd Crunch Cake

This was a little experimental. It happened when I saw a jar of lime curd in the supermarket and couldn’t stop thinking about it. This happens me sometimes with ingredients, which I realise sounds odd, but I had to try it out and it turned out to be seriously tasty.

My parents came over and were willing guinea pigs – we obliterated almost half the cake; I don’t expect the other half to last much longer. This turned out to be a lovely fluffy kind of cake with zingy little pockets of lime curd and a crunchy top. Just perfect with a cup of coffee and some cream on the side. Don’t volunteer to make the second pot of coffee because when your back is turned this happens …

130g butter, room temperature

170g golden caster sugar, plus 2 tblsp for sprinkling

150g plain flour plus 1 tblsp for coating the tin

1 tsp baking powder

3 large eggs

25g ground almonds

2-3 tblsp flaked almonds

1 jar lime curd (you will use about 200g of the curd)

zest of 1 lime


Preheat your oven to 170c. Butter and flour a deep round springform baking tin.

Mix the curd and lime zest together and set aside.

Cream the sugar and butter together in a stand mixer until pale, fluffy and creamy – a few minutes. Now mix in the flour and baking powder followed by the eggs and ground almonds. Don’t overmix.


Spread evenly in the tin and then with the back of a teaspoon, make little indentations in the batter. Put a spoon of curd in each hollow. Sprinkle 2 tablespoons of golden caster sugar over the top, followed by the flaked almonds.

Bake in the oven for 30 minutes, until golden on top and a tester comes out clean of batter (but not of curd – that’s allowed!)

Cool in the tin for ten minutes then remove the sides and cool further. Serve with whipped cream.