Goat Cheese and Dill Potato Cakes

Here’s a quick and easy supper or lunch solution – tasty and not totally making you go cold turkey (!) this January 😊 Baby steps!

500 g leftover mashed potato (well mashed, cooled)

100g creamy goat cheese (I used St Tola)

3-4 tblsp fresh dill, chopped finely

1 egg beaten 1 tblsp fresh lemon juice

flour to coat the cakes

oil for frying

rocket and garlic mayo to serve

Mix the mash with the cheese, dill egg, lemon and garlic in a bowl until they are well combined. Chill in the fridge for an hour which will make the mix easier to form into patties.

Scoop the mix into golf ball sized amounts and gently flatten and dust with flour. Handle gently they are delicate!

Heat the oil in a pan and gently fry until golden and cooked through. Serve with the rocket and mayo.

Baileys Blondies with Pecans and Coconut

So my previous Christmas post on the Santa Hat Brownies was for children (big and small alike) and this one is more for the adults, but I do confess my kids enjoy these too. These are the blonde version of the brownies. I am all for equality, me. They make a quite a few, 24 the way I cut them, and they last for a few days and even longer in the freezer well-wrapped. I think anything with Baileys in it has quite the Christmas edge!


50g pecans
25g coconut chips
225g butter
380g light brown sugar
1 tsp vanilla extract
2 large eggs
3 tblsp Baileys
300g flour
1 tsp baking powder
50g chocolate chips (I prefer plain/dark)

Preheat the oven to 160c and toast the pecans and coconut chips on a baking tray for 5 minutes, watching carefully so that the coconut doesn’t burn. Chop the pecans and set both aside for later.

Now increase the oven to 170c. Grease and line a 13×9 brownie tin with baking parchment and set aside.

Melt the butter, either in a saucepan or in a bowl in the microwave (the latter is my preference) stir in the sugar until smooth and well combined. Now add the eggs, vanilla and the Baileys, stirring to combine well.

Now add the flour and baking powder stirring well – no sneaky pockets of white!

Finally add in the coconut, pecans and chocolate.

Add to the tin, smooth over the top and bake in the oven for about 30 minutes – I start to check from about 25 – a tester in the middle should just come out clean. Usually in my oven they are done between 30-32 minutes.

Leave to cool and then cut – this is much easier when they are cool. The blondies make a tasty accompaniment to a cup of coffee or go equally well with vanilla icecream.

Santa Hat Brownies

It’s December! I can legitimately talk about some Christmas cooking and baking treats now. It’s our favourite time of year. The decorations went up yesterday, the lights in the village are being turned on later today and the Late Late Toy Show was on so the season has truly begun. We have a few favourite treats to go with the festive cheer and the first on our list are these little bites. I am a bit of a tart (!) when it comes to brownies having a favourites list of recipes stretching into double digits, but these are very cute and simple. The recipe came from a coworker of my husband’s in Toronto. He came home from work years ago raving about these little bites and was sent in with strict instructions not to return without the recipe, so thank you YuYen. She used a saucepan to make them, but I have used a bowl and a microwave with success and I have also used caster sugar here too. I gave them a festive twist with the addition of strawberries and cream, but you can also use buttercream for this too. I do like the fresh cream which works well with the sweetness of the brownies (and goodness knows there’s enough sugar floating around so for once I don’t mind eschewing it in favour of something a little more low key) The small size means they are a handy finger food dessert too.

Makes 25


170g chocolate (plain, at least 50%)

115g butter, very soft

60ml Chocolate syrup (note I use Hersheys which I have seen in Supervalu and Centra)

1tsp vanilla extract

2 eggs, beaten

75g flour

160g caster sugar

pinch of salt if you have used unsalted butter

To decorate:

25 strawberries, topped and tailed

150-200ml cream, well whipped


Preheat the oven to 175c. Butter and line an 8×8 inch tin. I like to line mine for ease of lifting them out.

Start by melting the chocolate in spurts in the microwave (if you are more comfortable melting in a saucepan, no problem!) I usually do it in bursts of 30 seconds to avoid burning, stirring each time.

Stir in the chocolate syrup, followed by the butter, beating  until well incorporated and smooth.

Now add the eggs and vanilla, mixing well.


Finally the sugar and the flour, mixing well and making sure there are no sneaky pockets of white lurking there.

Pour into the prepared tin, smoothing out and bake in the preheated oven for 30 minutes (checking before the end – mine are usually done around the 28 minute mark)

Allow to cool in the tin. These little guys are much easier to cut if you pop them in the fridge for a while (or even the freezer for five minutes) as you will get a much cleaner line. The picture below is what they will look like when you are in a rush to get to the neighbours but are running late and do not have enough time to do this, not that bad but if you are a perfectionist it may make you twitch ever so slightly.


When cool and just before serving, it’s time to decorate.

I use a Ziploc bag (or you can use a piping bag) with the corner snipped to pipe little mounds of cream on each brownie.

I then top with a strawberry and finish with a splodge  dot of cream.

You can dust with icing sugar too for that extra Christmas effect.


Daube of Beef and allweek dinners


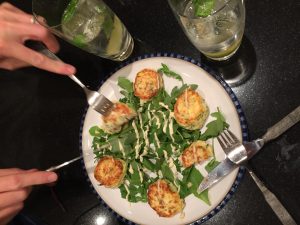
This is one of our family favourites and comes from Economy Gastronomy by Allegra McEvedy and Paul Merrett, as is evidenced from my well spattered and well thumbed copy, pictured above! This is a little gem of a book. There’s a section of the book devoted to recipes like this one; you devote a little bit of prep, let it cook over a long slow couple of hours, then hey presto you have the most delectable building blocks for a few more meals. It’s just perfect for winter days.

In the original recipe, tins of beef consommé are used, but I have also used extra beef stock cubes instead with equal success. I have made it using half the quantities which I find goes quite far in terms of feeding us, but if you are going to the trouble, I figure you may as well make it as listed and freeze some for another day when you are short on time.

10 shallots, peeled, left whole

350g lardons of bacon

15g thyme, washed, but left whole

5 cloves of garlic, minced

olive oil

1 bottle of red wine

2.5kg diced beef (not too small)

1 litre beef stock (made with stock cubes)

2 tins of beef consommé (about 800mls total)

Preheat your oven to 170C (fan 150C) and put a bit roasting tin to preheat on the hob on a medium heat. Cook the shallots garlic thyme and lardons gently in a few spoons of olive oil until the shallots are soft and the bacon is browning. Now pour in the wine, stirring all the sediment from the bottom of the tray and bring to  simmer. Let this reduce for 10 minutes or so. Gently lay the meat on top (there’s no need to brown it – yay! just season well with salt and pepper) Now pour over the hot stock and the consommé, if using, making sure that the meat is covered. Bring to a simmer and cover with foil, tightly, before putting in the oven for 2.5 to 3 hours. Check after 90 minutes or so to see if the meat it at the stage where it is giving way. If so, then remove the foil for the last half an hour of cooking so that the sauce reduces a little.

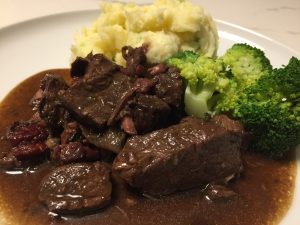
This is just lovely served with mash and greens, as the authors suggest. If you do want to freeze it, spread it out thinly on a baking tray to allow it cool quickly before freezing.


Some of this leftover beef is very easy to transform into a tasty pasta dish, I sometimes shake it up with sliced peppers too. Don’t leave the salsa out, this really makes the dish and it is ready in two minutes!


400g of the beef, above

700ml sauce, above

300ml sliced mushrooms

250g dried pasta (tagliatelle, or any wide pasta is good, but any in the cupboard will work!)

salt and pepper

olive oil

butter

parmesan, grated

400g tomatoes, chopped

packet basil leaves, chopped

1 tblsp flatleaf parsley, chopped

1.5 tsp red wine vinegar


Put the beef, sauce and mushrooms into a wide pan and cook over a high heat on the hob for 30 minutes, stirring often and mashing the meat up with the back of your wooden spoon, letting nearly all the liquid disappear. While this is happening, get the pasta cooking and mix the tomatoes, herbs and vinegar together in a bowl and set aside for garnish.

Fold the drained pasta into the meat with a spoon of butter and the parmesan. Spoon the salsa on top and serve with more parmesan on the side. NOM!


Now, if you have not been persuaded to eat all of the above already, you can use the rest of the meat to make a third meal – Pasties! The original recipe calls for swede, carrots, allspice and peas, but I added a middle-eastern twist to mine for a change, but feel free to to add whatever is in your fridge.

300g of the meat reserved from the original recipe

40g butter

200g butternut squash, diced into 1cm

2 small carrots, diced small

1 red pepper, diced small

3/4 tsp sumac

3/4 tsp ground cumin

mint and coriander, about a tblsp each, chopped

500g shortcrust pastry

1 egg, beaten, to glaze

Preheat the oven to 200c or fan 180c. Take your pastry out of the fridge. Shred the leftover beef. Melt the butter in a large pan and gently sauté the vegetables with the spices, covering them with a lid, but stirring regularly. Add the cold meat and herbs, remove from the heat, taste and season if needed and allow to cool, chilling in the fridge while you can – this will make it easier to wrap in the pastry later.

Roll out the pastry on a lightly floured board, to prevent it sticking. cut out 4 x 20 cm circles and brush the edges with egg mix. Divide the meat mix in four and join the pastry together folding it gently in a half moon shape, crimping the edges together. Brush the pasties with egg and place on a baking tray, I find it handy to use a little bit of baking paper underneath to prevent it sticking. Bake for 30 minutes until piping hot and golden.

Toasted Quinoa, Oat and Chocolate Chip Cookies


These not-so-little cookies have been a real hit since I started making them earlier this year. I’ve used the quinoa flakes in granola and wondered what they would be like toasted and added to cookie dough. They work really well and are a big hit. I have used chocolate chips and of late, I’ve chopped up a bar of chocolate (we like the dark choc for added flavour and slightly less of a sweet vibe) The chopped up chocolate works well as these are not delicate little babies and they can take the enormous uneven melty chunks of chocolate running through. They are nice warm, but will also keep a few days but I cannot confirm any longer than one or two for obvious reasons.

Makes about 20

250g plain flour

100g oats

75g quinoa flakes

1 tsp baking powder

2 tblsp cocoa

200g caster sugar

200g butter, softened

2 eggs

1 tsp vanilla

200g chocolate chips or 2 x 100g bars, chopped


Preheat the oven to 180c. Line two baking sheets with parchment and set aside for later.

First of all, toast the oats and quinoa flakes. Place them on a baking tray and toast them in the oven for 5-8 minutes, stirring once. Remove and allow to cool while you prep the other ingredients. 

Sieve the flour, baking powder and cocoa into a bowl and set aside.

Cream the butter and sugar until pale and fluffy, then add the eggs and vanilla and beat until combined. Now add the flour mixture in two to three additions, making sure each addition is fully mixed in before adding the next.

Fold in the oat and quinoa mixture, followed by the chocolate chips. Scoop the dough onto the baking tray – I use about 2 (generous) tablespoons for each cookie, leaving space between each as they spread a little.

Bake for 15 minutes, rotating if they are baking unevenly. Leave to cool on the tray for five minutes, then remove onto a wire tray.

Hazelnut Scones two ways

Hello there! Things have been a little hectic in the Treacle kitchen of late but today I managed to have a little time to bake some of these autumnal beauties. I saw Lorraine Pascale had the inspired idea of decorating the top of her scones with a slice of fig and I thought they looked just beautiful so why not try that idea to jazz up a recipe that I have used for quite a time? It’s a Diana Henry one for hazelnut scones that I have enjoyed making for a while. I have messed around with the recipe, substituting plain for wholemeal flour and light brown sugar for dark.  I think the scones can take it. The fig is the first topping and the second is well, a little more whimsical. It’s a coffee icing which also screams autumn I think, but is also a nice foil to the crunchy scone underneath. It’s got a blob of maple syrup for good measure too.

Makes 12 or so , using a 2 inch round cutter

400g fine wholemeal flour, sifted

50g dark brown sugar

1 tblsp baking powder

170g cold butter

180ml cream

60ml milk, plus maybe a little extra if needed

75g roughly chopped toasted hazelnuts (I dry toast in a pan and rub in a clean teatowel to remove the skins before chopping or you can buy them pre toasted and chopped too)

1 egg beaten, to glaze scones

1-2 figs to top (optional)

Coffee icing  (optional): note this will ice/drizzle roughly 6 scones generously

70g icing sugar

1 tblsp butter

1 tblsp maple syrup

1-2 tblsp strong coffee

Preheat the oven to 200c. Line a baking sheet with baking parchment and set aside for later. Mix the flour with the sugar and baking powder in a big bowl and then rub the butter in until the ingredients resemble breadcrumbs (or grate the butter in like I do!) Then add the cream and combine with a knife, using the milk thereafter conservatively to bring it all together to form a dough. Add a little at a time – you can’t undo it! Now add in the hazelnuts, working them in without handling the dough too much – this will make it tough.

Turn the dough out onto a floured worktop and flatten it into a circle about 1.5cm thick. Cut out the scones and place on the lined baking sheet.

Brush with the beaten egg and top with a thin slice of fig if desired, pressing it in gently on the top of the scone.

Bake for 15 minutes or so until golden. Cool slightly on a wire rack.

To make icing: Melt the butter in a small saucepan, letting the nutty flavour develop but don’t let it burn! Add to the icing sugar together with the syrup and one spoon of the coffee and whisk to form a paste, which shouldn’t be overly runny, but should allow you to drizzle. You may need to add a little more coffee or icing sugar to get the right consistency. Drizzle over the scones while still warm on the rack (place some parchment underneath to catch the excess)

Enjoy!


Spanish Style Pizza Chicken

This is a version of an old pinterest slow cooker recipe that I have been making for a good many years. It’s a handy slow cooker one that pleases the family and is a bit of a novelty both in terms of flavour and variety. The original used pepperoni and my riff uses chorizo with some smoked paprika but both are tasty. Parma ham and feta or cheddar might be another interesting combination. Regardless it’s a very quick midweek solution to that what-will-I-feed-them question. Here’s your arsenal:-

4-5 chicken fillets

2-3 slices of deli chorizo (or salami/pepperoni – see above) PER chicken breast

200ml hot veg or chicken stock

1 tblsp tomato puree

1 tsp dried oregano

1/2 tsp smoked paprika

3 tblsp sliced black olives

50g grated mozzarella

Place the chicken breasts in the slow cooker and season. Put two to three slices of chorizo on top of each breast.

Now mix the stock with the oregano, tomato puree and smoked paprika and pour over the chicken.

Sprinkle the olives on top. Put the lid on and cook on low for 5-6 hours. Half an hour from the end of cooking, sprinkle the mozzarella over the chicken, cover and cook for a further 30 minutes until the cheese has melted.


Serve with pasta or salad.


Hasselback Potatoes with garlic and parmesan


I love this way of cooking potatoes. It makes them look fancy. I therefore, feel a little fancy! They are dead easy and tasty and persuade even my non-spud-eating seven year old to eat potatoes which makes it an achievement in itself.

First, preheat your oven to 200c and get your roasting tin ready. It’s almost a non recipe in that you take potatoes (one to two or whatever is required per person) You need to slice them very thinly now, but not all the way through, so each potato sits on a large dessert spoon while you slice, thereby preventing this happening.

Now place them carefully in the tin and drizzle with a little oil and a sprinkling of salt and pepper and roast for 40 minutes. Near the end of this time, melt a little butter (couple of tablespoons, depending on how many spuds you are roasting) with a clove or two of crushed garlic. You can add some chopped fresh herbs at this point if you like too, such as oregano, thyme or rosemary.

Take the tin out and carefully brush the melted butter over the potatoes. You can finish with a grating of parmesan too if it takes your fancy.

Pop back in the oven and finish off roasting for 15-20 minutes, depending on the size of the potatoes. The outsides will be all crispy, the insides tender and the herbs garlic and salt add lovely flavour and crunch.


Coconut Cashew Granola

The kids are back and the mornings are more rushed and we all have to be more organised. This naturally leads to a little more planning in advance for breakfasts and less options and choice (doesn’t it just sound like fun?!) I like to have some things on standby that I actually like to eat on weekday mornings so that I don’t fall into the rushed piece of soggy toast trap that leaves me starving by 10am. Most mornings this is porridge, but granola makes for a nice treat before the mornings get too chilly. Lots of the shop bought granolas, as you know, are full of sugar and really belong more on your dessert plate than in your breakfast bowl. On the other hand who really wants to chow down on cardboard and pretend to like it? Not me, life is too short. If I’m doing that, I’ll moan about it or I’d rather not bother at all. This strikes a balance somewhere between the two. Full of goodness with seeds, nuts and oats and quinoa flakes and a little sweetness delivered by the maple syrup while the egg white lets the clusters form without the need for a motherload of sugar. I have resisted adding any dried fruit to this one, but feel free to add your own combination if you like. I like to eat it with some greek yoghurt and fresh fruit.


Coconut and Cashew Granola – Makes enough to fill 1 mason jar of about 1 litre volume

150g oats

50g quinoa flakes

pinch maldon sea salt

2 egg whites

60mls maple syrup

zest 1 orange

1/4 tsp cinnamon

1/4 tsp ginger

1 tsp coconut oil

25g linseeds

25g flaxseeds

50g pecans

50g cashew nuts

50g coconut flakes

Melt the coconut oil and the maple syrup together with the spices in the microwave – try 30 second bursts  -it should not take very long. You just want to loosen up the syrup and melt the oil. Whisk it to combine. Preheat the oven to 150c and line a baking sheet with parchment. Mix the oats, quinoa flakes, seeds and nuts in a bowl. Mix in the oil/syrup well to coat. Whisk the egg whites until stiff peaks form and then fold the egg whites into the mix until fully combined.

Spread on to the baking sheet and bake for 35-40 minutes or until golden. Check halfway through cooking – you may want to stir to prevent it over clumping and to allow it to bake evenly, but you want some crunchy clusters to remain. Remove and allow to cool completely before storing in an airtight jar for up to two weeks.

Chickpea and Orzo Soup with Pancetta

I love this soup. It’s lovely and thick, almost like a stew, has lots of veg, some pasta, the saltiness of bacon (good currency to persuade my kids to eat it) and the welcome bite of chickpeas. It’s also quite forgiving – I’ve substituted four carrots instead of three if I don’t have a rib of celery and rocket for the baby kale. Even some frozen peas would work too. It works a treat as an all in one supper for me. I’d eat it nearly every day if I could.

Makes 4 bowls:

1-2 tblsp olive oil

1 onion (red or brown) diced

3 carrots peeled and diced

1 rib of celery diced

2 cloves of garlic, crushed

1-2 sprigs rosemary, finely chopped

1 litre of vegetable stock

120g of orzo

1 tin chickpeas drained (note – cannellini beans also work well – I’ll tend to use one or other as I always have at least one in the press)

130g pancetta, fried until crisp and patted on kitchen paper

Handful of rocket leaves or baby kale or spinach – any soft greens will work

8-10 diced cherry tomatoes and 1 tblsp chopped basil mixed, to serve, if you like.

Grated parmesan is also good, to serve on top

Heat the olive oil in a heavy pot and gently sauté the onion, garlic, celery, carrots and rosemary until softened but not coloured. This will take about ten minutes or so.  Add in the orzo and drained chickpeas and stir, followed by the stock. Stir and bring to a simmer, cover and cook for 8-10 minutes until the orzo is cooked through.

Now add the pancetta and stir the greens in, taste and season if needed. Ladle into bowls and top with the tomato topping if desired.